A Burlington homeowner in one of those narrow Victorian-era brick semis off Brant Street called us last fall because their new ensuite already felt wrong. The vanity was beautiful, the tile was on point, and yet every morning they were bumping elbows with the toilet, fighting the door swing, and stepping out of the shower onto a wet floor that drained nowhere. The bones of the room were fine. The layout was the problem, and the layout had been locked in before the first piece of drywall went up.
Most of the bathroom renovation projects in Burlington that come to us mid-build are stuck on the same handful of layout decisions, and almost all of them trace back to assumptions homeowners made on day one. This post walks through the most common bathroom layout mistakes we see specifically in Burlington homes, why they happen in this housing stock, what to do when you spot them in your own plans, and how to keep them out of your next reno.
In this article
- Squeezing a full four-piece into a narrow downtown floor plan
- Ignoring fixture clearances the Ontario Building Code expects
- Forcing a master ensuite into a Plains Road suburban semi without rerouting plumbing
- Designing a waterfront condo bathroom with no real storage
- Letting a swinging door eat half the bathroom in a central Burlington bungalow
- Treating lighting and ventilation as afterthoughts
- Download the Burlington bathroom layout audit checklist
- Watch a designer walk through bathroom layout mistakes
- Frequently asked questions
- Sources and references
Please note: This article is for general guidance only. Costs, products, regulations, and best practices change. Kitchen and Bath Reno is not liable for outcomes from actions taken based on this content. Always confirm with a licensed renovation professional for your specific Burlington home.
Squeezing a full four-piece into a narrow downtown floor plan
The symptom: you stand in the doorway of a bathroom in a pre-war home near Spencer Smith Park and the toilet, tub, and vanity are all crammed against one wall, with a sliver of walking space that forces you to shuffle sideways. The room reads as cluttered even when it is spotless.
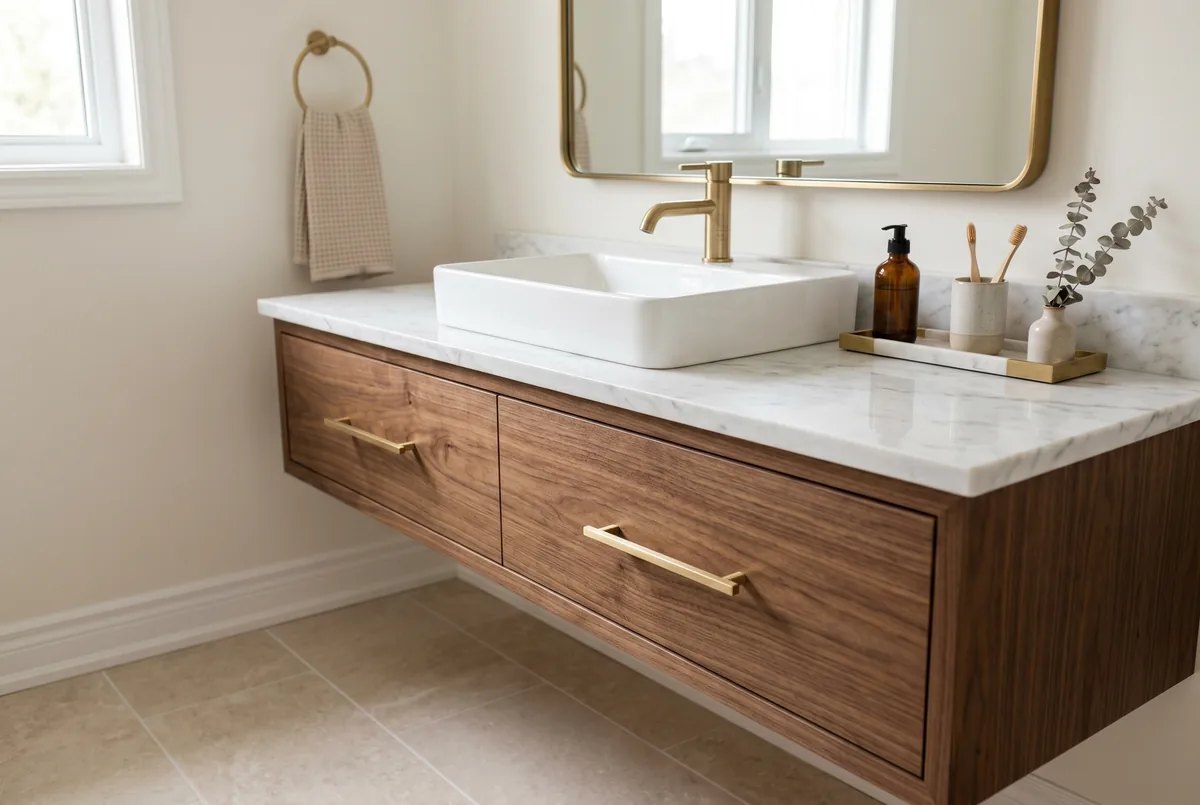
Why it happens: the original floor plans for many central Burlington homes built before 1955 allocated about 35 to 40 square feet to the main bathroom. That was generous when the only fixtures were a sink, toilet, and clawfoot tub. The moment you add a modern 60 inch vanity, a deeper soaking tub, and a separate shower stall, the math stops working.
What to try first: drop the four-piece ambition. In a small footprint, a well-executed three-piece (toilet, vanity, walk-in shower) almost always feels bigger and works harder than a cramped four-piece. If you cannot live without a tub, consider a smaller alcove tub-shower combo at 60 by 30 inches instead of a separate tub and shower.
When to call a pro: if your bathroom is under 45 square feet and you are still trying to fit a separate tub, shower, double vanity, and water closet, get a designer to draw the plan before you order anything. Off-the-shelf vanity widths and fixture clearances do not bend, and the cost of a layout revision after framing is exponential.
How to prevent it next time: measure your space, subtract 5 inches for finished walls and trim, and lay out actual fixture footprints (a standard toilet needs a 30 inch wide clearance, a vanity needs 30 inches in front, a swinging door needs its own arc) on graph paper before you fall in love with anything.
Ignoring fixture clearances the Ontario Building Code expects
The symptom: the toilet is hard against the vanity, the shower door cannot fully open, or your knees press into the door when you sit down. On paper the room looked fine. In real life it fails the body test.
Why it happens: most homeowners design from the wall in, fitting fixtures to whatever space is left over. Designers and contractors who know the Ontario Building Code residential standards work the other way around, blocking out minimum clearances first and only then deciding what fits.
The clearances we treat as non-negotiable on Burlington renos:
- 21 inches of clear floor space in front of every fixture (toilet, vanity, tub) at minimum, 30 inches if you want it to feel comfortable
- 15 inches from the centre of the toilet to any side wall or vanity
- 24 inches clear in front of the toilet so your knees do not hit the opposite wall
- A door that does not swing into a fixture, and that has at least 4 inches between its open arc and any obstacle
Forcing a master ensuite into a Plains Road suburban semi without rerouting plumbing
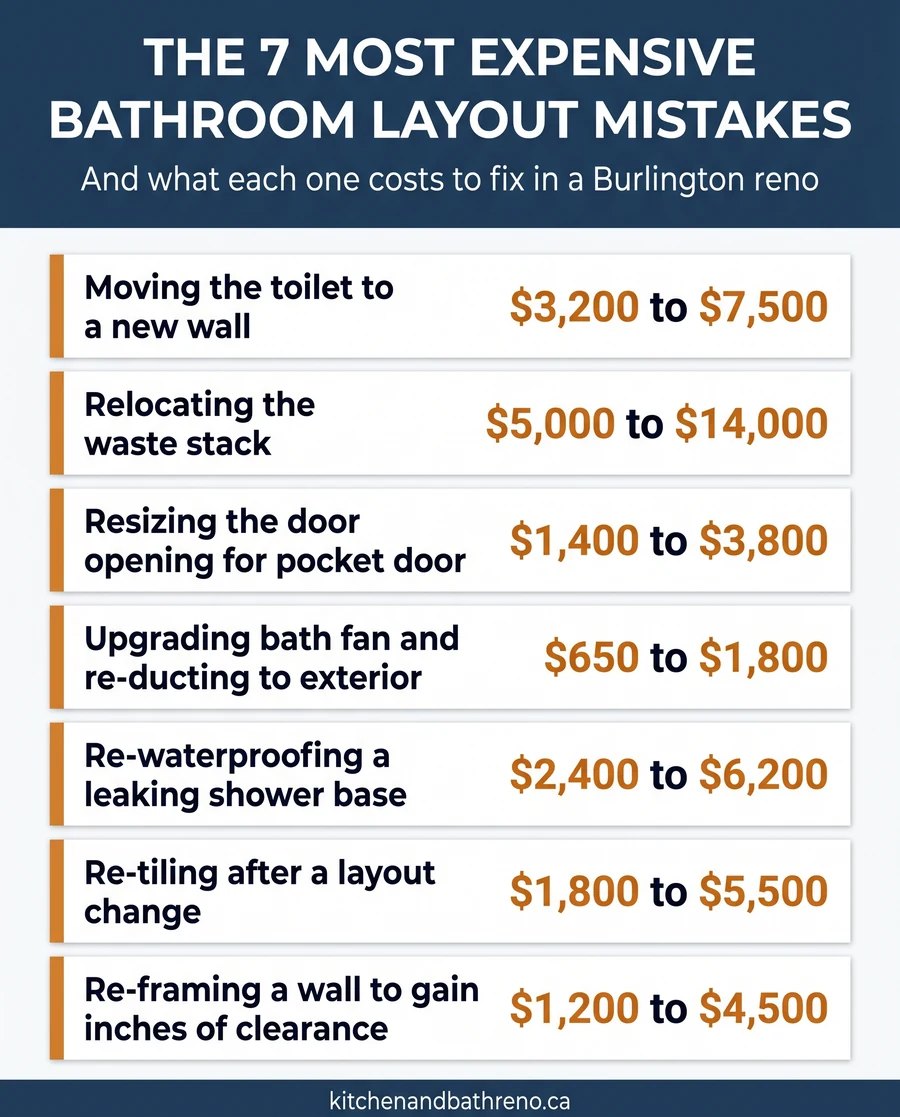
The symptom: a Burlington homeowner in a 1970s semi-detached on Plains Road wants to convert a 9 by 8 foot bedroom corner into a new master ensuite. The plumber says the existing waste stack runs through the opposite wall, and rerouting it adds twelve thousand dollars to the budget.
Why it happens: the suburban housing stock between Plains Road and the QEW was built with one main soil stack per unit, almost always in the kitchen or main bath wall. Adding a second-floor ensuite that is not stacked over the existing stack means horizontal drain runs, possibly a new vent through the roof, and depending on joist direction, a strapped-down ceiling on the floor below.
What to try first: locate the existing waste stack before you finalize the bathroom location. If the new bathroom shares a common wall with an existing kitchen or bath, you can usually tie in within 6 to 8 feet of horizontal run without major surgery. If the bathroom ends up more than 10 feet from the stack on a different wall, you are looking at a major plumbing relocation.
Save your money
Before you commit to a bathroom location, ask your contractor to open one ceiling tile or access panel and trace the existing waste stack. A two hour exploratory visit can save you a five-figure plumbing relocation. We have walked Burlington clients out of bathroom locations that looked perfect on paper but would have doubled their plumbing budget.
When to call a pro: anytime you are placing a bathroom on a floor that does not currently have one, or moving a toilet more than 4 feet from its current location. Drain slopes, vent stacks, and joist clearances are not DIY territory.
How to prevent it next time: walk the existing plumbing with your contractor in the planning phase, not after demo. Sketch the bathroom location around the stack instead of choosing the location first and forcing the plumbing to chase it.
Burlington permits at a glance
Any bathroom renovation involving plumbing relocation, structural change, or major electrical work needs a Burlington building permit. Cosmetic swaps do not. Confirm before demo via the City of Burlington building permits portal.
Designing a waterfront condo bathroom with no real storage
The symptom: the new condo bathroom near the Burlington waterfront looks like a hotel spa, all floating vanity and frameless glass, and within three months the countertop is buried in toiletry bottles because there is nowhere to put anything.
Why it happens: in newer Burlington condos along Lakeshore Road, the original developer bathrooms typically came with one small medicine cabinet and a vanity drawer. Owners renovating those bathrooms tend to chase a magazine look that further reduces storage, often replacing a real cabinet with an open floating shelf or a recessed niche that holds three bottles total.
Did you know
A typical Canadian household keeps between 35 and 50 personal care items in the main bathroom (toothbrushes, razors, hair tools, skincare, prescriptions, cleaning supplies). If your new layout only has open shelving and a single vanity drawer, that volume has to live somewhere, usually on the counter.
What to try first: protect 30 percent of your vanity wall for closed storage. A taller mirror cabinet (medicine cabinets now come in 30, 36, and 48 inch widths), drawer banks instead of a single cabinet door under the sink, and a slim full-height storage tower in a dead corner can triple the usable storage without changing the room footprint.
How to prevent it next time: inventory what you actually keep in your current bathroom (open the cabinets, count the categories) before designing the new one. A storage plan beats a styling plan every time.
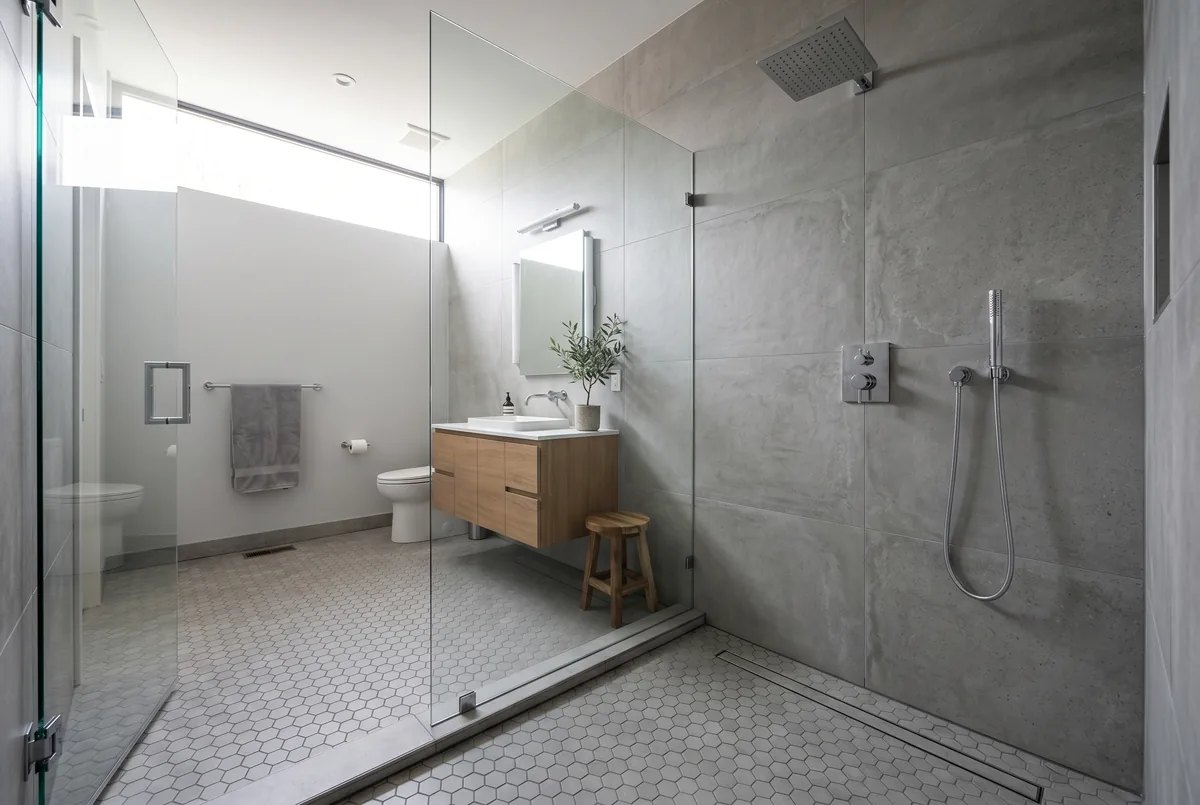
Letting a swinging door eat half the bathroom in a central Burlington bungalow
The symptom: in a post-war bungalow off Guelph Line, the inward-swinging bathroom door takes up roughly 9 square feet of floor space every time it opens, leaving so little room to stand that the door has to close before you can use the vanity.
Why it happens: builders in the 1950s and 1960s defaulted to standard 30 inch hinged doors that swing inward, partly for privacy and partly because pocket door hardware was expensive and finicky at the time. Modern pocket door hardware is silent, smooth, and inexpensive, but homeowners still default to replacing the existing hinged door with another hinged door because it is the path of least resistance.
Red flag
If your bathroom is under 50 square feet and you have a hinged door, the door arc is almost certainly stealing more usable floor space than the toilet. Map the arc on the floor with painter’s tape before the next reno meeting. If the tape arc covers half the room, the door is the problem.
What to try first: a pocket door, an outward-swinging door (if the hallway can take it), or a 32 inch barn-style sliding door on a track outside the room. Any of these can recover 6 to 10 square feet of usable bathroom floor.
When to call a pro: pocket doors need a hollow wall cavity at least 4.5 inches thick and have to clear plumbing, switches, and outlets. If the wall is a structural wall or carries plumbing, get a contractor to confirm it can be opened up before you order the hardware.
Treating lighting and ventilation as afterthoughts
The symptom: the finished bathroom looks beautiful in the listing photos but turns out to be poorly lit for shaving or makeup, and the mirror fogs solid every morning because the existing bath fan was undersized and the new room sealed up tighter.
Why it happens: in older Burlington homes near downtown, the original bathroom often had a single ceiling fixture and a window for ventilation. When that window goes (closed up for tile work or because the new layout puts a shower against the outside wall), the existing 50 cfm fan is no longer adequate. Layered lighting (ambient, task at the mirror, and accent) is treated as an upgrade rather than the baseline.
What to try first: at minimum, size your bath fan to one cfm per square foot of bathroom (a 60 square foot bath needs a 60 cfm fan, a bathroom with a soaker tub or steam shower needs more), and run the duct to the exterior, not just the attic. For lighting, plan three layers: one ceiling fixture for ambient, sconces or LED bars at the mirror for task, and either a tub-area pendant or a toe-kick LED for accent.
How to prevent it next time: write the electrical and ventilation plan at the same time as the layout, not after. The bath fan, the wiring rough-in, and the switch locations all need to be coordinated before any drywall closes up.
Download the Burlington bathroom layout audit checklist
Take this with you when you walk your bathroom
A printable seven-section checklist that covers footprint, plumbing, door swing, storage, lighting, Burlington permit requirements, and a final pre-build sign-off list. Walk your bathroom with this in hand before you draw, demo, or order anything.
Watch a designer walk through bathroom layout mistakes
Sources and references
- City of Burlington , Burlington building permits portal
- Government of Ontario , Ontario Building Code residential standards
- Electrical Safety Authority , ESA Ontario electrical permit guidance for homeowners
Frequently asked questions
Quick recap and next steps
- In narrow downtown Burlington homes, drop the four-piece ambition. A clean three-piece almost always feels bigger and works harder.
- Block out Ontario Building Code clearances first, then fit fixtures into what is left.
- In Plains Road semis, locate the soil stack before you finalize the bathroom location, not after.
- In waterfront condos, protect 30 percent of the vanity wall for closed storage.
- In bungalows with small bathrooms, switch to a pocket, barn, or outward-swinging door before anything else.
- Plan lighting, ventilation, and electrical at the same time as the layout. Not after.
Note: All prices mentioned in this article are industry averages and may vary based on project size, materials, design, layout, and scope of work. Contact us for a free personalized renovation estimate.
Planning a bathroom renovation in Burlington?
We design and build bathroom renovations across Burlington, Oakville, and the broader Halton Region. Book a free in-home consultation and we will walk your layout before you commit to anything.

Written by
Priya S.
Bathroom Design & Material Specialist
Priya specializes in the study of bathroom renovation trends and material standards across the GTA. Her work focuses on small-space transformations and budget-smart material selection to help homeowners maximize both style and function in modern bathrooms.